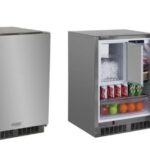
Did your refrigerator ice maker stop making ice? Do not panic; it is most likely a matter of getting a new water line kit. For obvious reasons, your fridge needs a water line kit, so it can give you all the ice you want. This is why today, we’ll be sharing different types of refrigerator water line kits with you.
Refrigerators that feature built-in water dispensers or automatic ice makers must be connected to a water source. Water can be provided in one of two ways: connecting the fridge directly to plumbing via a water line or manually adding water to a reservoir inside the fridge. Fridges without ice makers or water dispensers don’t need any type of water source to function properly.
However, if you are new to refrigerator water line kits and find yourself on the lookout for the best possible option, things may seem a bit overwhelming with many models in the market. But do not fret because we’ll be sharing with you different types of refrigerator water line kits for your needs.
Refrigerator Water Line Kits FAQs
What is a water line kit?
A water line connection and filter kit is an economical option to connect most water sources that use 1/4 inch standard tubing, including Reverse Osmosis (RO) systems, refrigerators, icemakers, water coolers, dispensers, humidifiers, and more.
What is a refrigerator water line?
A water line allows you to make ice in your refrigerator. Water can be provided in one of two ways: connecting the fridge directly to plumbing via a water line or manually adding water to a reservoir inside the fridge.
Does the fridge come with a Refrigerator Water Line Kit?
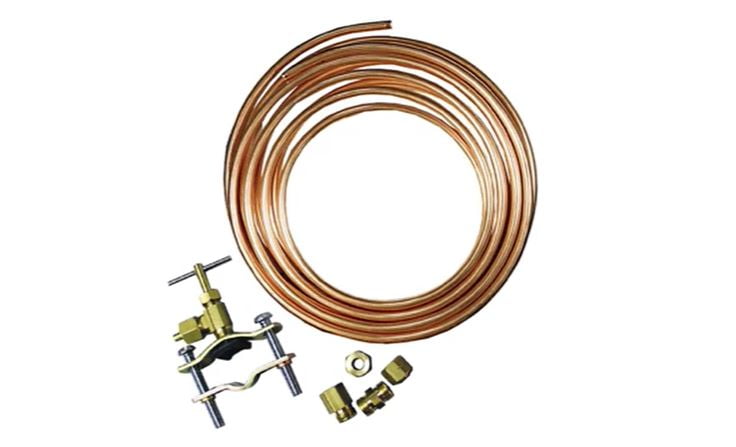
Water lines are typically sold in kits and are not included with the refrigerator. It is recommended to use a water line installation kit that uses 1/4 inch copper tubing, a 1/4 inch compression nut, and a ferrule.
Is it easy to run a water line for a refrigerator?
This type of fitting is easy to install and is less prone to leaking than a saddle valve. In most cases, the water line can be run from a kitchen faucet water supply line through the kitchen cabinets and over to the refrigerator.
Are all refrigerator water lines the same?
Tubing Sizes. Most flexible plastic water lines for refrigerators come with either 1/4 inch or 5/16 inch outside diameters, revealing Darrin’s Plumbing Tips. Check your refrigerator’s owner’s manual or the manufacturer’s website for the recommended size and type of water line for your unit.
What type of water line fits a fridge?
Decide what tubing material you want to use for your water supply line. The tubing should have a diameter of 1/4-inch and can be a copper line, braided steel line, or plastic tubing. Many professionals prefer copper lines, but plastic tubing is commonly sold as part of ice maker installation kits.
Can a fridge make ice without a water line?
A water line allows you to make ice in your refrigerator. Refrigerators that feature built-in water dispensers or automatic ice makers need to be connected to a water source. Fridges without ice makers or water dispensers don’t need any type of water source to function properly.
Refrigerator Water Line Kits
1. Ice Maker And Humidifier Installation Kit
No products found.
Get your appliances set up quickly and easily with this ice maker/ humidifier/ evaporative cooler installation kit. Poly tubing is durable and reliable and will not ruin the fresh taste of your water.
This complete installation kit includes everything necessary for installation, plus step-by-step instructions to make D-I-Y installation a breeze.
What Our Testers Say
I bought this for a hose repair inside a humidifier….. Bryant HUMBBLBP2217-A. The old tube was 1/4” OD stiff tubing. This showed up quickly. It had all the parts I needed to install a compression fitting… so no extra trips to the hardware store. Nice. Tubing was the exact fit and exact stiffness of the original.
I have plenty of tubing and parts left over when my other humidifier breaks! I did not use the copper tap. I have used them in the past and they work ok. But if I had needed something like that I would probably cut the copper and install a new joint. Anyway… a good product and exactly what I needed.
Best of all, there’s no need to shut off your water supply during installation.
What We Like
- Easy Installation
- Poly Tubing
- Durable
What We Don’t Like
- Brass Inserts are not Large Enough.
2. Metpure 1/4″ & 3/8″ Ice Maker installation Kit
No products found.
Uses purified water from your reverse osmosis system or other water filtration systems to provide you with clean, clear, and delicious ice cubes.
This 1/4″ and 3/8″ RO ice maker line kit is an ice machine water line that will connect from your existing reverse osmosis system or standard filtration system to the refrigerator or other appliance.
What Our Testers Say
This is an easy-to-install kit for connecting a Reverse Osmosis system to a refrigerator ice maker. All of the components are of good quality and will provide a leak-free solution if installed correctly. It is important to refrain from using tools to tighten any of the components (especially the threaded connector). Simply hand tighten and check for leaks when the system is back under pressure. I had no problems with this kit and would buy it again if needed.
This kit includes NSF-certified LLDPE tubing, a quick-connect inline ball valve, a union tee, a quick-connect adapter, and a fast-connect stem reducer to provide everything you need to set up your ice maker on your refrigerator.
What We Like
- Easy Installation
- Functionality
- LLDPE Tubing
What We Don’t Like
- Some Buyers said their unit came without a Compensation Nut.
3. Ice Maker Fridge Installation Kit
No products found.
This kit comes complete with a 25′ white tubing, heavy-duty brass universal adapter tee with a 1/4″ shut-off valve at the water supply end, and a 1/4″ quick connect adapter at the appliance connection end.
Field technicians and plumbers put this kit together to ease their onsite installation, and now it is available to the general public.
What Our Testers Say
Purchased to run a line from our kitchen sink plumbing to a newer GE bottom freezer fridge. The fridge came with the ice maker installed and ready to go, with the quick-connect line waiting for the water supply. Had a plumber friend do the under-sink hookup just in case something went wrong (our house has some very strange plumbing), but I can see how easy it was to just insert it between the water line and the hose leading up to the faucet. Ran the included line around to the fridge, and hooked it up via the quick-connect adaptor included in the package. We have ice! I’d have preferred a metal connector for the line-in/fridge quick-connect adaptor, but this seems to work fine. Used plumbing tape to make sure we had a good seal. All in all, a good purchase and easy to install.
Linear low-density polyethylene (LLDPE) line is extremely flexible, crack and impact-resistant. It is the perfect material of choice for running fridge water lines by professionals due to its high bendability.
What We Like
- Durability
- Non-Toxic
- Easy Installation
What We Don’t Like
- Some users Complain Their Valve Leaked
4. YUHX Water Filtration Refrigerator Ice Maker
No products found.
Complete ice maker and refrigerator water line kit 25 feet tubing with easy-to-use stop feed water adapter; includes everything necessary for a complete installation.
This ice maker water line kit can be a water line connection from an existing water supply valve & line to your point of use.
What Our Testers Say
If you’ve worked with any kind of plumbing you’ll know that the simplest looking things can be a pain but this kit installed very easily. The set consists of good-quality parts and extras to account for different installation details. There’s even a nice cutting tool to ensure that you have nice clean ends on the main water line.
You should note that the installation instructions come on one very small piece of paper and they are very brief. That said, the text is in good English (not always the case) and if you’re using this kind of kit you already should have a decent idea of what you’re doing so I stuck with 5 stars.
Tap into your existing shut-off valve from under the kitchen sink and create an extra inline 1/4 inch tee for fridge connection, RO system feed, water filter system feed, soda fountain, coffee brewer water line, etc.
What We Like
- No Odor
- No Drilling
- Multifunction
What We Don’t Like
- Installation Instructions are vague.
5. iSpring ICEK Ultra Safe Fridge Water Line
No products found.
This kit includes everything you need for the installation. Push-in quick-connect fittings offer easy DIY installation with no tools required.
Connect any water filtration system (including reverse osmosis systems) to the ice maker or water dispenser of your fridge.
What Our Testers Say
Bottom Line Up Front: If you want to relocate your system (to the basement for example) you can do it but you will lose some pressure
I got tired of having the cabinet under the kitchen sink filled with the RO system. I bought two ice maker kits and set up the filtration system in the basement. The extra length of tubing added about 40 feet in total (20 feet in each direction) and the added line caused the pressure to drop a bit at the RO faucet at the sink. Water bottles take about twice as long to fill, which I expected given the added line. I installed the two shut-off valves in line with the system (city water inlet and clean water outlet- see picture) so I could easily shut off the water when it was time to change the filters. I can now access the system easily and shut off everything when I have to change the filter.
In doing the move I found that the black waste hose was too short (because I had shortened it to fit under the sink.) I contacted iSpring and Don Huie helped me get a replacement hose.
The iSpring fridge connection kit connects your reverse osmosis system or other water filters to your fridge. It can be used to supply your refrigerator’s ice maker or water dispenser, your coffee maker, etc.
What We Like
- Plastic
- Durable
- Easy Installation
What We Don’t Like
- The Tube Line is a Bit Short.
How to Install a Refrigerator Water Line Kit
- Turn off the water: Locate the fixture shut-off valve on the cold water supply line under the kitchen sink. Close the shut-off valve by turning it clockwise until it stops. If it has a lever-type handle, turn the lever, so it is perpendicular to the water pipe.
- Disconnect the water faucet line: Place a rag or small bucket under the supply valve to catch water draining from the supply tube. Disconnect the faucet supply tube from the valve using two pairs of pliers or two adjustable wrenches.
- Connect the tee adapter: Thread the Add-A-Tee adapter onto the outlet port of the shut-off valve, tightening by hand at first. Finish tightening the adapter with two pairs of pliers, using one pair to hold the valve and the other to tighten the adapter.
- Connect the faucet and refrigerator supply tubes: Reattach the faucet supply tube to the 3/8-inch outlet on the Add-A-Tee. Tighten the connection with pliers, as before. Attach one end of a 1/4-inch flexible supply tube onto the 1/4-inch outlet on the adapter, and tighten it with pliers.
- Connect the supply tube to the refrigerator: Run the new supply tube to the back of the refrigerator. Connect the end of the tube to the 1/4-inch water supply fitting on the refrigerator.
- Turn on the water: Open the shut-off valve under the sink by turning the knob counterclockwise all the way or turning the lever, so it is parallel to the water pipe. Check for leaks at all connections.